 Better Practice Blog
- 6 Things You Didn't Know YouTube Could Do For Musicians
6 Things You Didn't Know YouTube Could Do For Musicians
YouTube in Music Education
As teachers, we all know the struggle of having a lot of ground to cover and only being given 30 minutes to an hour a week to do so. A lot of times, I’d feel my really motivated students were being held back only by this limit of how much information I could throw at them in half an hour. But if I threw too much at them, chances are they’d only remember about a third of it.
So on went this daily struggle of finding the balance between teaching enough and teaching too much - until one day, I had an epiphany. It started with a flashback to lessons in college and how I would take home all the information that I didn’t trust my brain to remember: videos!
When my teacher taught me a lick or voicings, I would record a quick video of him playing it. Then I would go home and learn it there - but not waste time in lessons writing down the notes or committing it to memory. If it was a concept he wanted multiple students to review/learn at home, he would record a video and post it to YouTube, then email us the link. Again, this was a way for him to basically transfer his knowledge to us in a super-quick and efficient way. (If you’re a piano teacher and are new to recording videos, check out our article here for how to get a good angle of the keys.)
YouTube has allowed us to take lessons beyond lesson time. Whether it’s bowing, fingering, technique, posture - a lot of students require visuals to remind them how to properly do it at home. Or it can be things like proper instrument care, preparing a reed, or changing a guitar string - things that are integral to playing an instrument but you don’t have time to teach in a lesson. You can record quick videos on these topics, upload it online, and from then on, you can teach an infinite number of students by simply sharing the link.
But now, YouTube has gone beyond the simply uploading and sharing. Here are 6 things you can use YouTube for in both lessons and practice that aren’t so obvious:
1. Backing tracks
You can find backing tracks for practically any song on here (or if you make your own tracks, this is an easy way to share it with your students). If you play an instrument that is part of the rhythm section, you can sometimes search things like “no piano”, “bassless” or “bass removed”. Backing tracks do wonders to keep students engaged, playing in time, and listening! Not to mention it’s extremely fun. I have students get up and start dancing sometimes! In Better Practice, I often see the songs with backing tracks attached have exponentially longer practice times!
2. Slow-mo
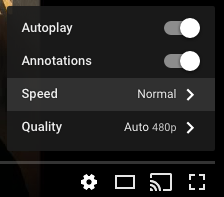
You see the Settings wheel in the bottom right of the video? Click it, then go into Speed to slow down (or speed up) audio without compromising pitch. This has been a lifesaver for transcription assignments or simply figuring out “How the heck is he doing that?”
3. Looping
To loop a whole video, just right-click on the video in YouTube and check “Loop” to have the video loop itself. To loop certain sections of a video infinitely, go to youtubeloop.net. Just search for your video or paste the link into the bar at the top, click “Go loop!”, and then when your video pops up, drag the orange arrows at the bottom to the section you want to loop.
The cool thing about this? You can create and share playlists of loops. As you enter in videos at the top, they stack up and form a playlist. Then, on each video, you can reposition the orange triangles for your loops, and then click the “Playlist Link” at the top.
4. Share with playback starting time
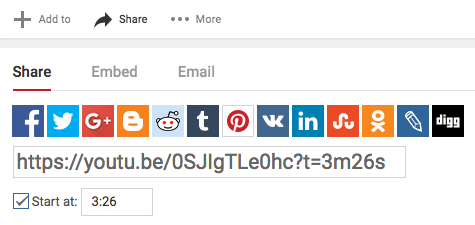
Maybe you’re sharing a video of a concerto but the student is only learning the 2nd movement. When you click Share under the video title, a bunch of sharing options pop up. Beneath the link, you can check the Start at: box and enter the start time. If you’re already at that point in the video, it’ll be auto-filled - just make sure to check the box and copy the new link.
5. Make/share playlists
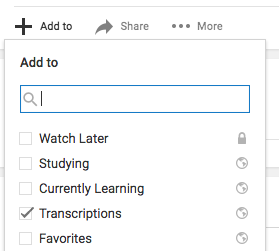
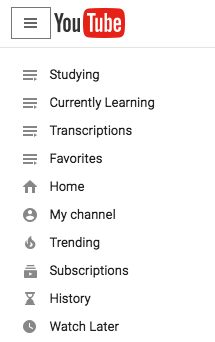
A lot of students don’t realize the listening is half the battle. If you’re trying to learn a new style, transcribe a solo, or get familiar with a new piece - you’ve got to listen! You can create playlists on YouTube of the student’s repertoire or songs in a certain style they have to learn (e.g. I created a funk playlist when I had a gig that required songs in that style) and share the link. Students are always online anyway - they can just open up the link and the videos will play consecutively while they do whatever they’re doing. To add a video to a playlist, click the + Add to under the title of the video and check the playlist or create a new playlist there. To view your playlist and get the sharing link, click the drop-down list in the top left corner of the screen and select your playlist.
6. Discover and be discovered
Did you know YouTube has resources specifically for musicians and music-lovers? Check out artists.youtube.com if you’re a musician looking to get started on YouTube. They provide artist resources, tips, and data to help you out.
And if you’re on the other end looking to discover new artists? Go to youtube.com/feed/music. They create non-stop playlists based on what you like and recommends a whole bunch of videos as well. Basically like Pandora, but I think better because it’s really tailored to what you’ve watched previously. Discovering music is at the core of staying inspired and developing tastes/styles!
I rarely have a practice session without using YouTube at least once. It’s become integral to my learning and practicing process - and how can it not be with all of these features? I no longer have to download songs to make playlists, click back and forth to loop sections, or get a program to slow down songs. It’s made practice time 300 times more efficient, so I try to pass down the habits to my students.
Make practice even easier by putting all of your YouTube resources directly into your students’ assignments! See how you can make your materials accessible with Better Practice.