Maybe you’re a teacher that wants to make your students’ practice more fun and engaging by providing them with backing tracks. Or maybe you’re a student that wants to quickly make a track to play along with.
This article will go show you quick ways to make backing tracks for any song you hear. You will need to know some basic theory (reading music and chord identification), but other than that, it’s not so difficult – especially with the aid of apps that can make the tracks for you (which is what I describe below).
I originally intended to make a tutorial simply for the ‘making a backing track’ part, but thought to include some basic chord identification tricks for students or those who haven’t learned this theory yet! After all, you can’t make backing tracks without knowing what chords to put underneath. Without further ado…
Step 1: Identify Chords
If you already have a lead sheet/chord chart or already know the chords, you’re all set to move to Step 2. You can also use this wonderful thing called the internet to find the chord progressions for almost any song. A quick search for “[song name] chords” should bring up something, usually guitar tabs which work fine. Some of these typically need some tweaking but provide a good enough base.
If you can’t find chords for your song (for example, if you’re trying to make some backing tracks for classical pieces), you’re going to have to either 1. use your ear or 2. grab the sheet music and make use of your theory knowledge. Honestly, chord analysis should and could be a whole book by itself. But we won’t get into that here. Most of the time, we can use a few select strategies to quickly figure out the chord progression and get to jamming! Disclaimer: this isn’t meant to be a proper theory lesson. Instead, we’re going to show you 3 very, very quick and dirty tips that work most of the time in identifying chords:
1. Bassline (by ear)
Listen to the bassline. This is always my first step in trying to figure out chords because the bass player/bassline is usually the key to it all. This is because it’s up to the bassist what chord I, the pianist, am playing. What I mean by that is: for example, Cmaj7 and Amin7(9) are the same notes (C E G B). Throw in inversions, and without any context (like a bass note), it could really be either one. So – listen to the bassist first. It’s easy because they usually play 1 note at a time, not 7 notes at a time like the chords you’re trying to figure out.
This is easier to explain with an example (Slide by Calvin Harris). Listen to the beginning of this (0-0:35ish):
You can already hear a bassline outlining the chords (put on your headphones if you can’t hear it!) – but if it’s a bit hard to make out, find a part of the song where the bass is more prominent! For this song, the bass really kicks in at 0:35. You’ll hear something like this:

Exact same notes as the beginning, but more rhythmic and pronounced. By figuring out the bassline, now you know the first chord is some kind of A chord, then a G# chord, then C#. Then F#, G#, A.
And then, I mean, this song is a pop song. There aren’t going to be any crazy substitutions or extensions. Just try out the basic chords (major triad/seventh, minor triad/seventh, dominant seventh, etc.) and you probably got it! (This one turns out to be Amaj7, G#min7, C#min7. F#min7, G#min7, Amaj7. That’s the entire song.)
2. Arpeggiated chords (with sheet music)
Another quick way to figure out chords in piano sheet music – look at the left hand of a song/piece. Usually, it’s either already playing the chord or the chord is just broken up and arpeggiated (or it’s playing the bass note!). Check it out:
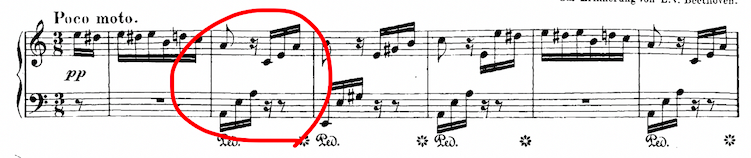
Here’s Fur Elise. Just look at the circled measure and write out the notes. There’s only As, Es, and a C. Rearrange it into a 1-3-5 and it’s an A minor triad (A-C-E). Ta-da! The measure after that would be an E major triad (E-G#-B). Super simple stuff. You can do that with almost anything you see these patterns for.
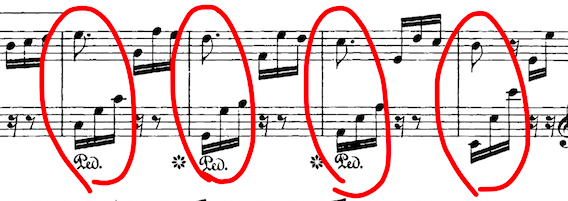
Remember to also look vertically too. Here’s the following section of Fur Elise:
The first arpeggiation has C and G on the left hand and an E on the right. C major triad (C-E-G).
The next has G and B on the left, a D on the right. G major triad (G-B-D).
And so on.
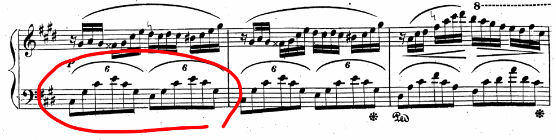
Now you can look at ‘complicated’ sounding songs like Fantaisie Impromptu and instantly find the chord progressions and make your own arrangements. (That circled measure is a C# minor triad).
3. Patterns/chord movement
Just like how you understand patterns for words, there are expectable patterns in most music. For example, you know that if someone says “and”, the following word won’t be “but”. If you meet up with someone and you hear them say, “How are…”, you expect it to end with “…you?”. Like this, there are patterns that can help you easily navigate through chords and chord analysis.
If you do a search on it, you’ll find a lot of good sources. There are lists of common chord progressions for pop songs, rock songs, jazz etc. and also rules for what chords can follow each other in classical music. I don’t want to list them all here, but here’s the absolute most basic one you’ll see often:
V – I. For example, in the key of C: G – C. (Or ii – V – I ( d – G – C)).
If you know what key you’re in and you hit a V chord, you can expect a I chord to follow. If you look back at Fur Elise, that first passage is just i – V – i – V – i… This is because a if you hear a V chord – especially a V7 chord – it just begs to resolve to the I. Try playing a V7 – I (G7 – C). Now, if you go back to the G7 – it doesn’t sound like you can end on it. It needs to resolve. Tension and resolution.
Step 2: Make your backing track
Now for the fun part: making the actual backing track! Here are a few ways available:
Easy
- Record yourself playing the chords on a chordal instrument (piano, guitar, etc.). Just play back the recording on a loop and have fun noodling over it! This is best for targeted practice over certain chord progressions you’re having trouble improvising over. You can also use this for whole songs if you’re okay without the drums/bass.
Medium
- For something with a full rhythm section that takes very little effort on your end to make, try backing track apps! All you have to do is enter the chords/chord symbols and the program will produce a backing track for you. For teachers making tracks for their students, you should look for apps that allow you to export the audio file so you can attach it to your students’ assignments in Better Practice.
Hard
- If you want to make your own custom tracks from scratch and you have a good understanding of chords, basslines, and percussion, you can use some sort of DAW (digital audio workstation) like Garageband. There are countless tutorials on this online if you search “make your own backing tracks”. This has a much higher learning curve than the other 2 options, but also have the potential to be the most beautiful and creative.
Hopefully you now have some chord identification tricks up your belt to make starting the process a little easier. Transcribing things isn’t supposed to be easy right off the bat! You’ll have to repeat things over and over, hum along, and sometimes just guess ’til you get it right. Some of you are blessed with better ears than the rest of us and can pick out stuff quickly. Most others just need to transcribe often and get a feel of what chords sound like, and it becomes much easier eventually. You’ll begin to notice that many songs have similar chunks of chord progressions that you hear and think, “Aha! I already know what he’s doing there.” In fact, teachers, making a backing track would be a great assignment for your students!
Of course, learning proper theory is the biggest help – especially jazz theory. But for those of you who don’t have time for all that or are just getting started, I hope these tips could help!
If you think this can help out your students and friends, please share!
We LOVE backing tracks as they are the modern day metronomes. Playing along can help speed up improvements bigly – BUT backing tracks are only effective if you can keep up with it. With Better Practice, we make it easy to adjust the speed of the backing track to match your level and then you can incrementally speed it up when you’re ready! Try it out at betterpracticeapp.com or email us to schedule a free demo.